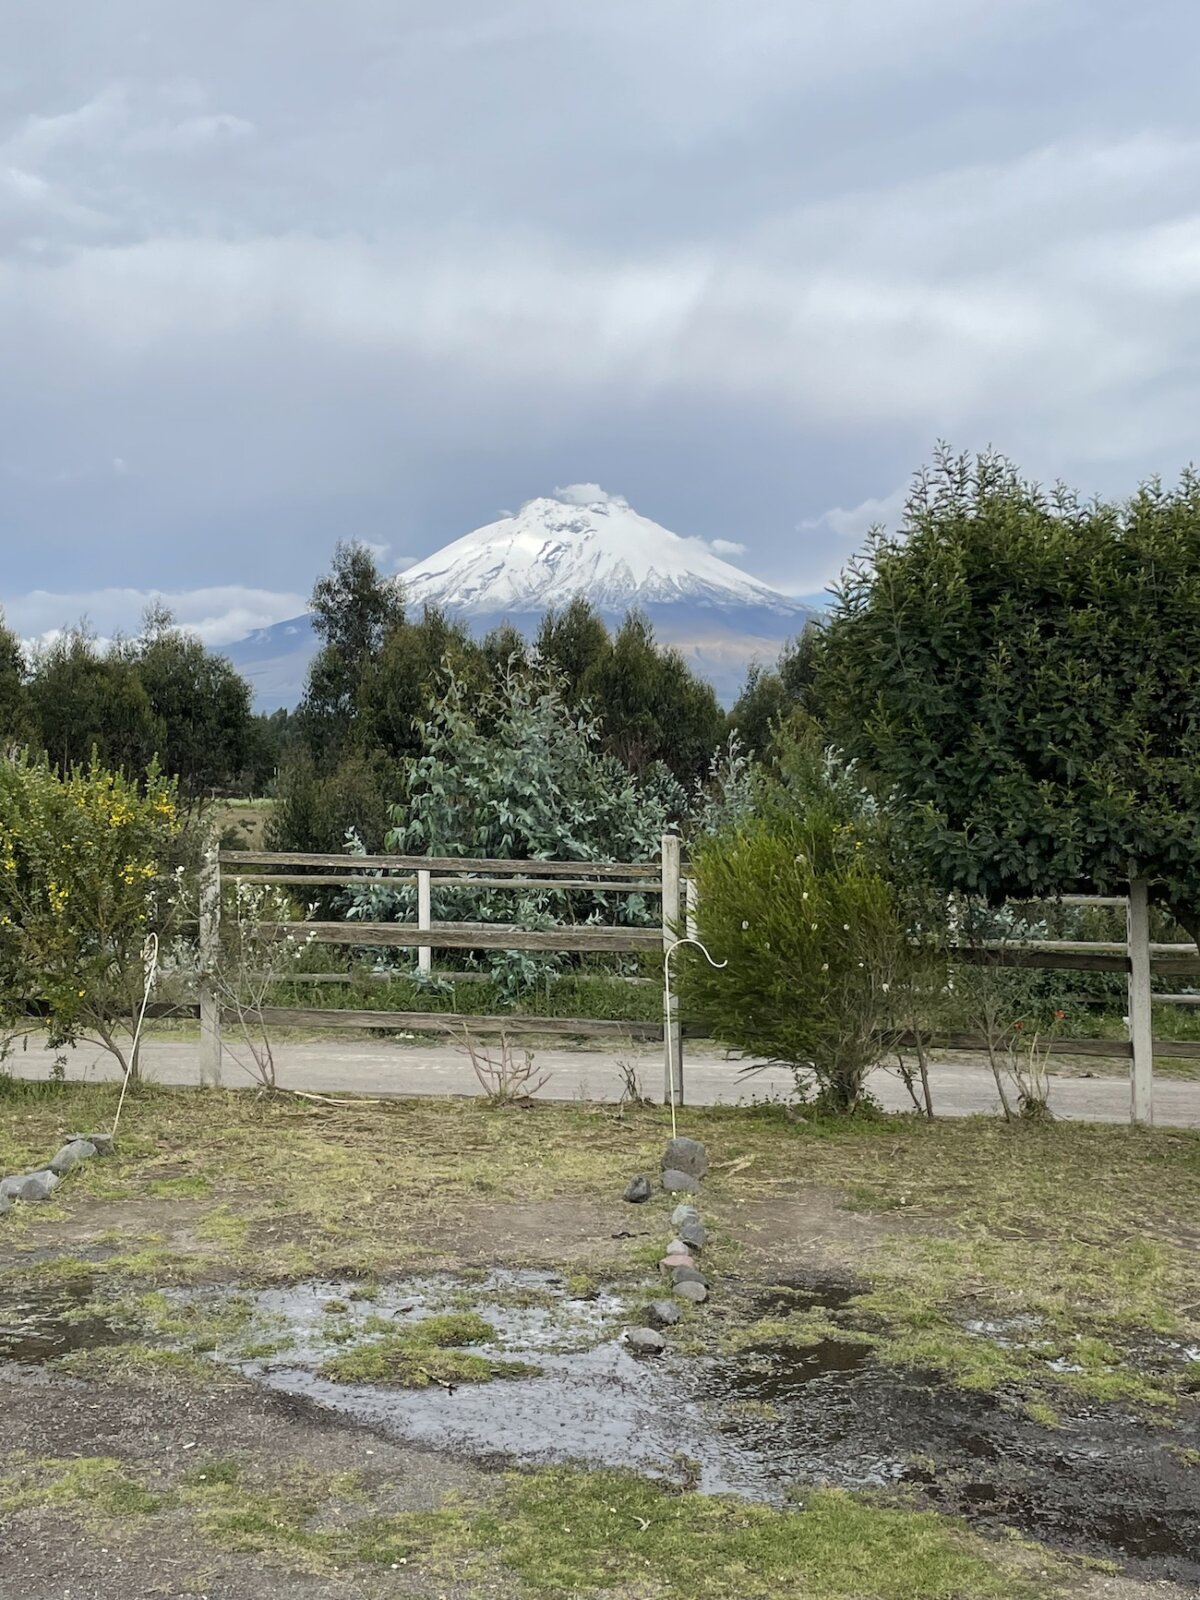
Cotopaxi Volcano is less than two hours from Quito and well worth a visit. When we entered the park we were greeted by a park ranger who explained to us that our little Chevy Spark (who we affectionately named Sparky) would make it to the lake but would not make it further. We had read several reviews online with mixed reports. Some people said they made it in very small cars like ours and other people said you need a 4-wheel drive to get up the volcano.
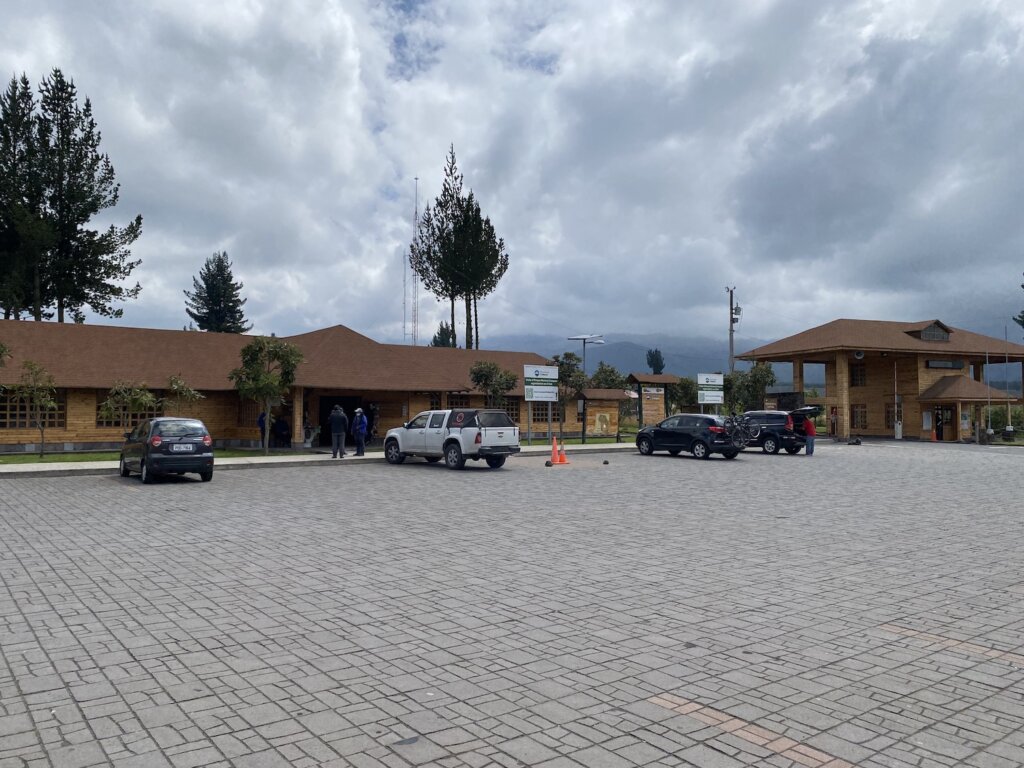
We were offered a local guide who would drive us up to the refugio in his truck for $60. That price included our park entrance fee which on its own is $10 (we think per car not per person). We decided not to risk it and took the guide. From the entrance, he began driving us up the windy road to the lake and then on to the parking lot for the refugio.
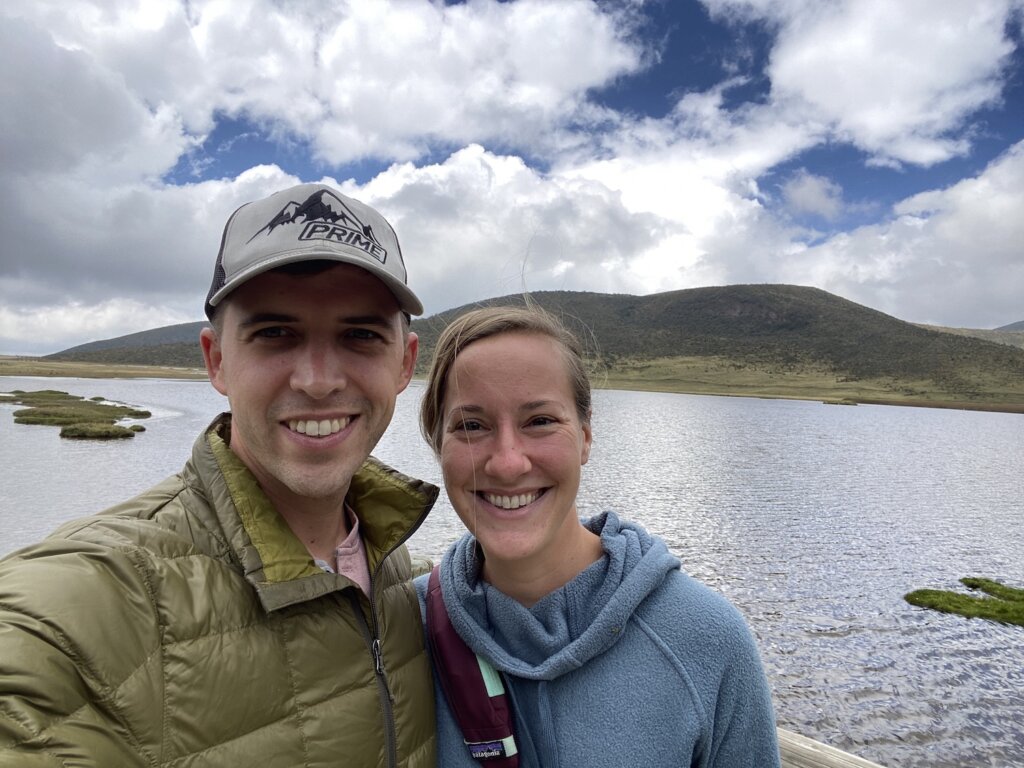
The lake is home to several species of birds which you will likely see. You can also get great views of Cotopaxi and the surrounding volcanos if it is a clear day.
From the lake the road continues up the volcano until you get to 14,750 ft elevation where the parking lot is for the refugio. The hike up to the Refugio is about 1km and takes you up to 15,953 ft elevation. The summit of the volcano is at 19,347 ft elevation. We read in several blogs before we left, that from the refugio you can walk to the start of the glacier. They day we hiked our guide told us we couldn’t hike up any further than the refugio. We think this was due to the snow cover as it was pretty snowy at the refugio. We were there in November which is a month that typically has more snow cover.
For the hike up to the refugio you have two options- a switchback path or a straight-up path. We chose the switchbacks which seemed to be what everyone was doing. Our guide said we should expect 45 min to an hour to complete the hike. We are pretty active and we made it up in 30 min with multiple rest breaks to catch our breath and take in the views.
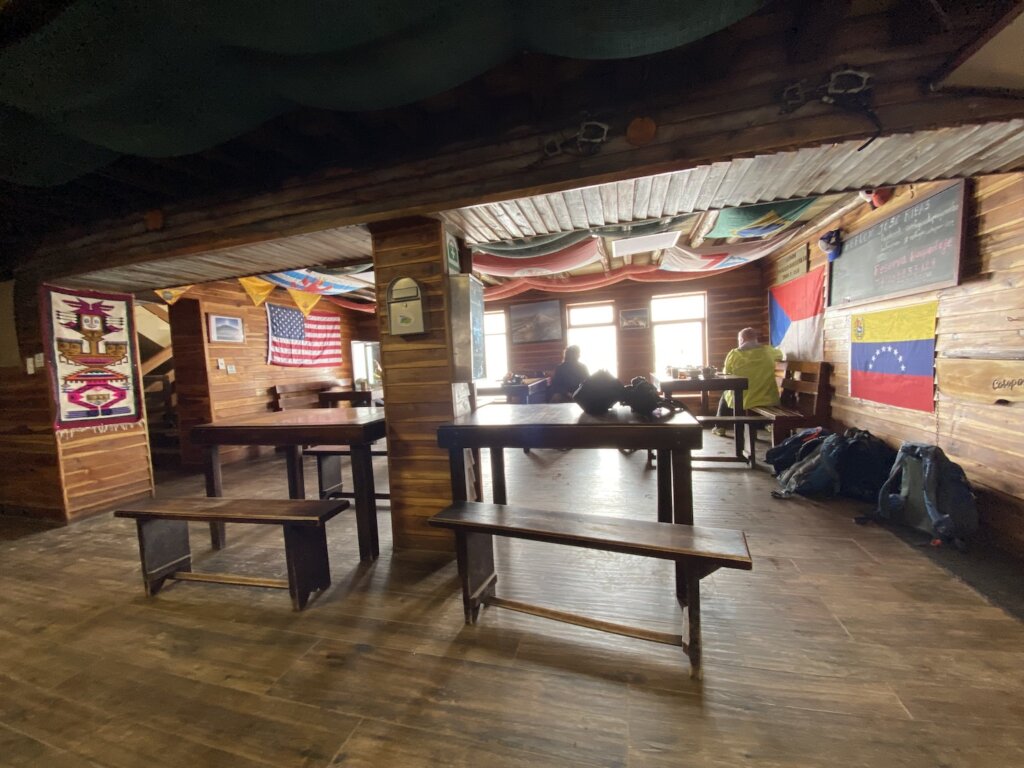
Once you are at the refugio you can order hot chocolate, soup, and sandwhiches. It was the best hot chocolate we have ever had! There are flags hung on the walls of each country that has had hikers make it to the summit. Each flag is signed by everyone who made it to the top.
We got very lucky during our visit and got to see a fox up close, walking along the parking lot. As we drove back down the volcano we saw several wild horses grazing along the road.
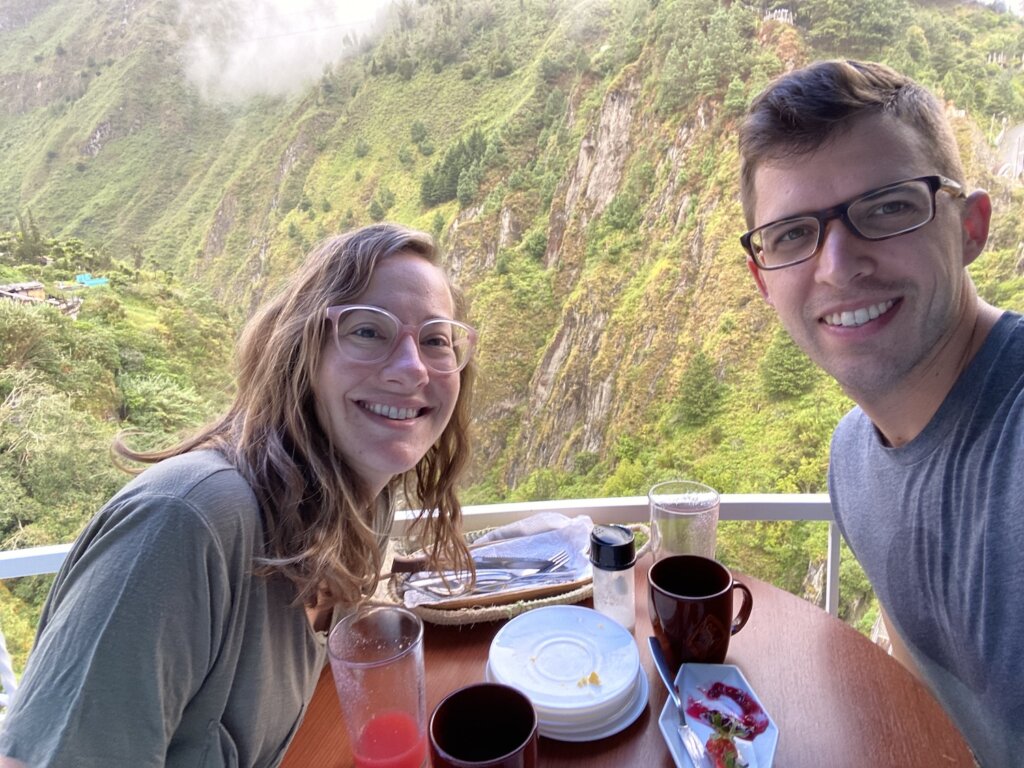
After our morning hike we stayed nearby at Cuscungo hosel and lodge The hostel had a great view of Cotopaxi once the clouds cleared. We had a great room with beautiful views and an upper balcony/deck area with a hammock. They had a great fireplace that was lite all evening. They set out warm water for tea before dinner. Dinner included soup, a main course and dessert. Breakfast was also served. Breakfast was included and dinner cost an extra fee but was well worth it.
We were very happy we stayed here. The whole experience was great. Staying near Cotopaxi also gave us more time/a better chance of seeing the entire volcano. The weather here is super unpredictable. While we had a view of the glacier during our hike we never saw the entire volcano until much later in the day while relaxing at the hostel.
We hope you enjoy your trip if you do visit this amazing place! Tell us what you love about Cotopaxi and about Ecuador. Leave us a comment below.
Quito is a huge city. Where you chose to stay will most definitely effect your experience. We read a great article describing the best areas/neighborhoods to stay in Quito.
At the beginning of our trip, we stayed near the historic center to see all there is to see in that area- read our post herefor details. At the end of our trip, we had one final night in Quito and we wanted to explore/experience another area of the city. Based on what we read in the article mentioned above we chose La Floresta, said to be an artsy part of town full of great restaurants and cafes.
Where is the Food:
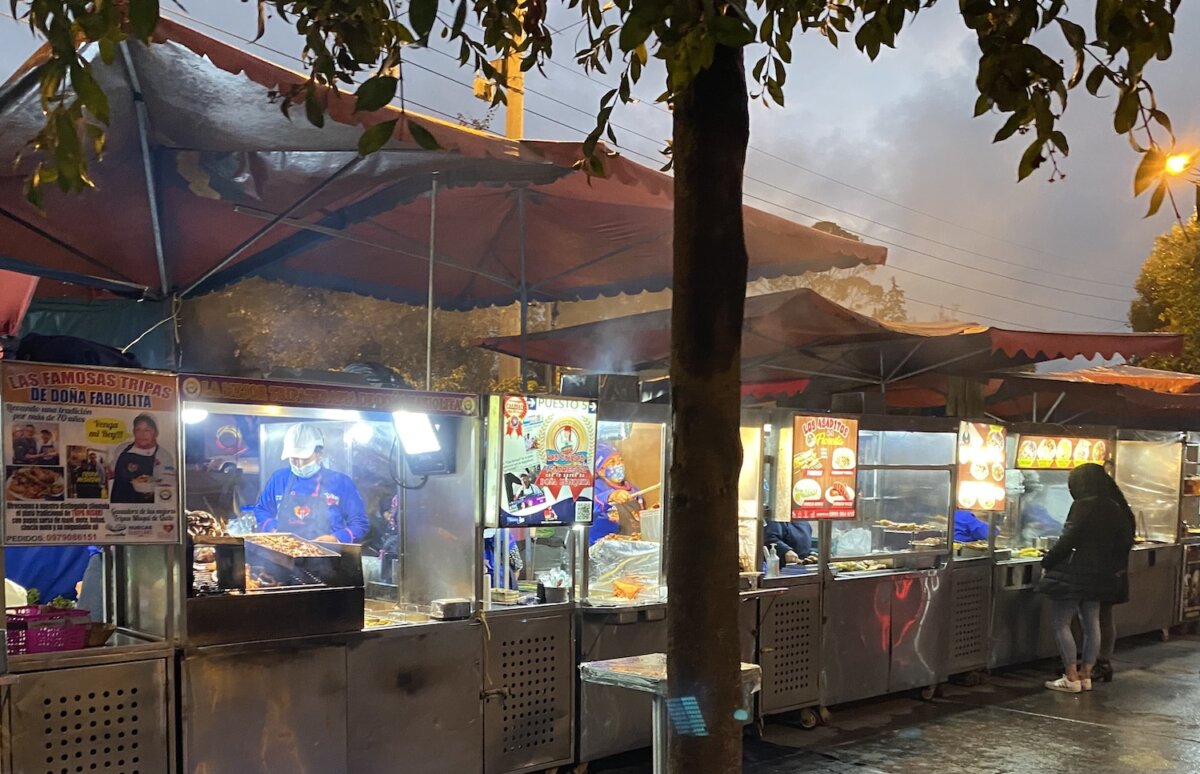
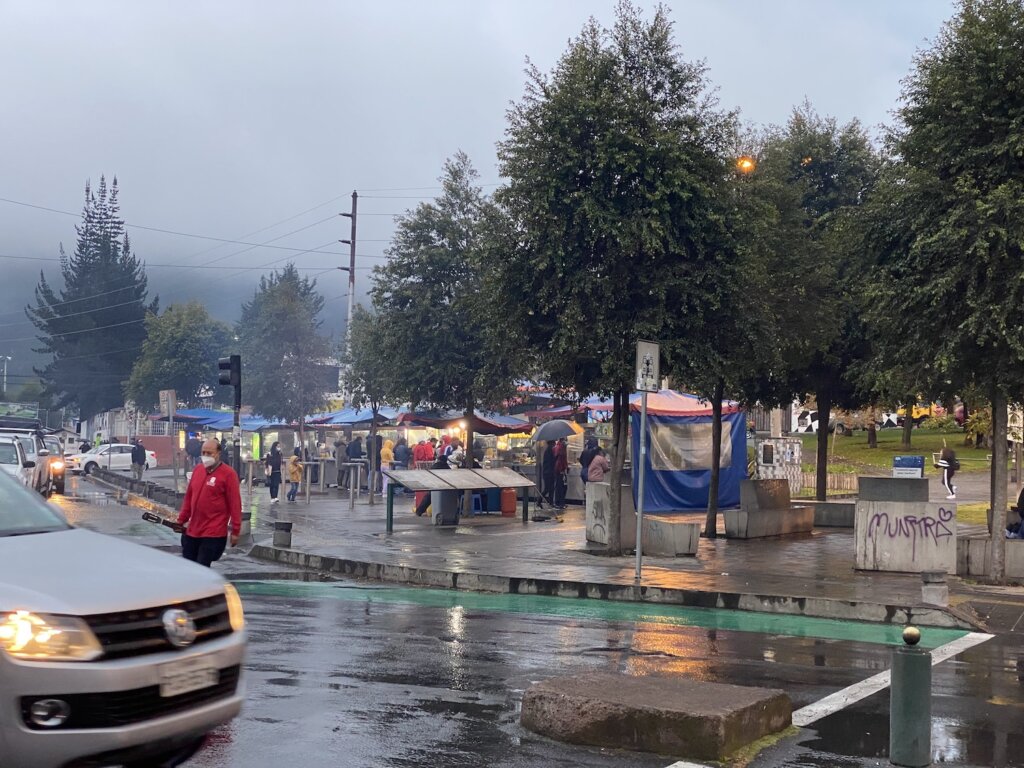
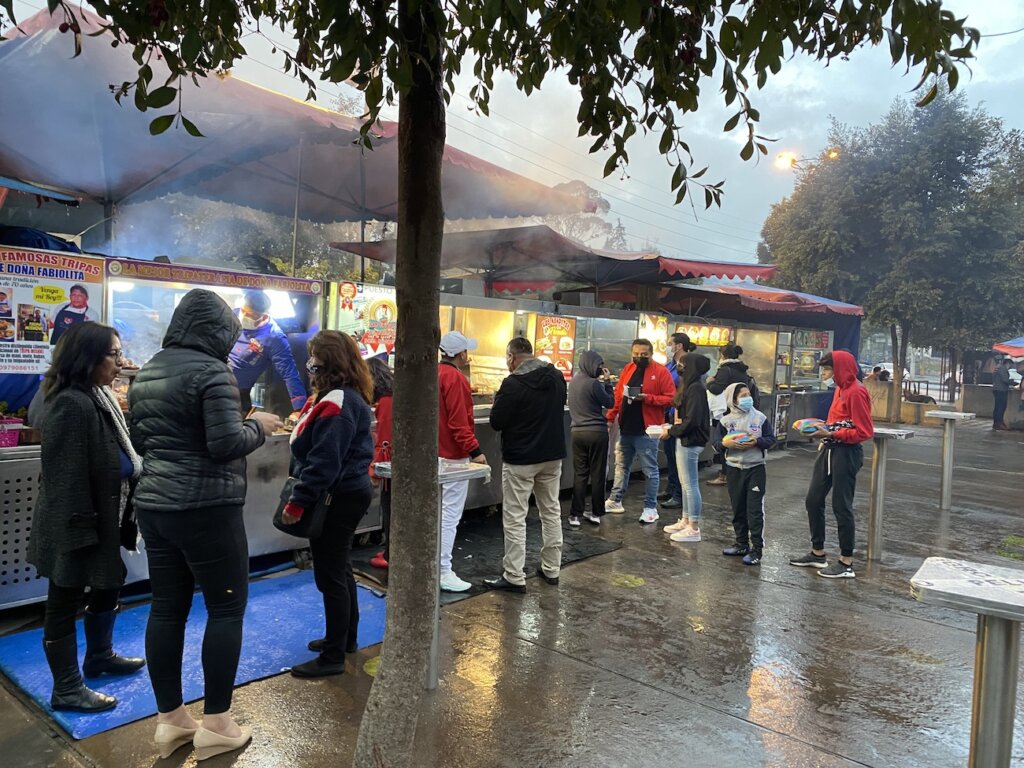
We then came across another great post describing the street food carts in La Floresta park- really called Navarro park when you are looking for it on the map. The post we read said the food carts begin setting up in the evening. We found that when we walked by the area around 3:30 in the afternoon the carts were already serving up food and pretty busy.
What to Order:
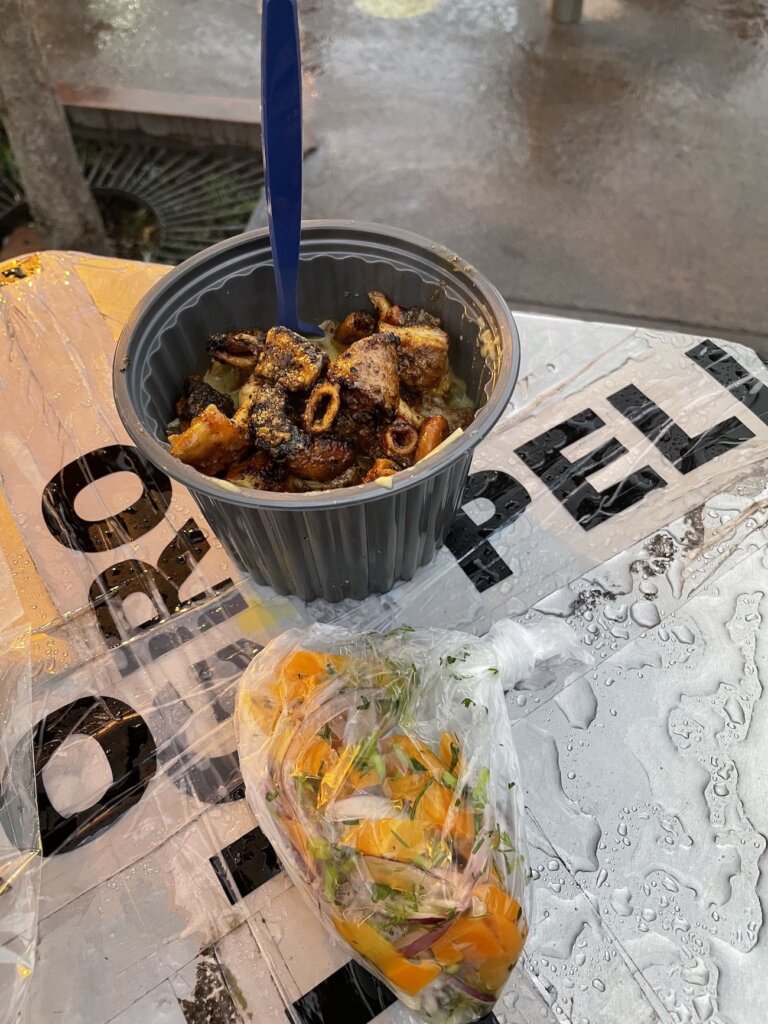
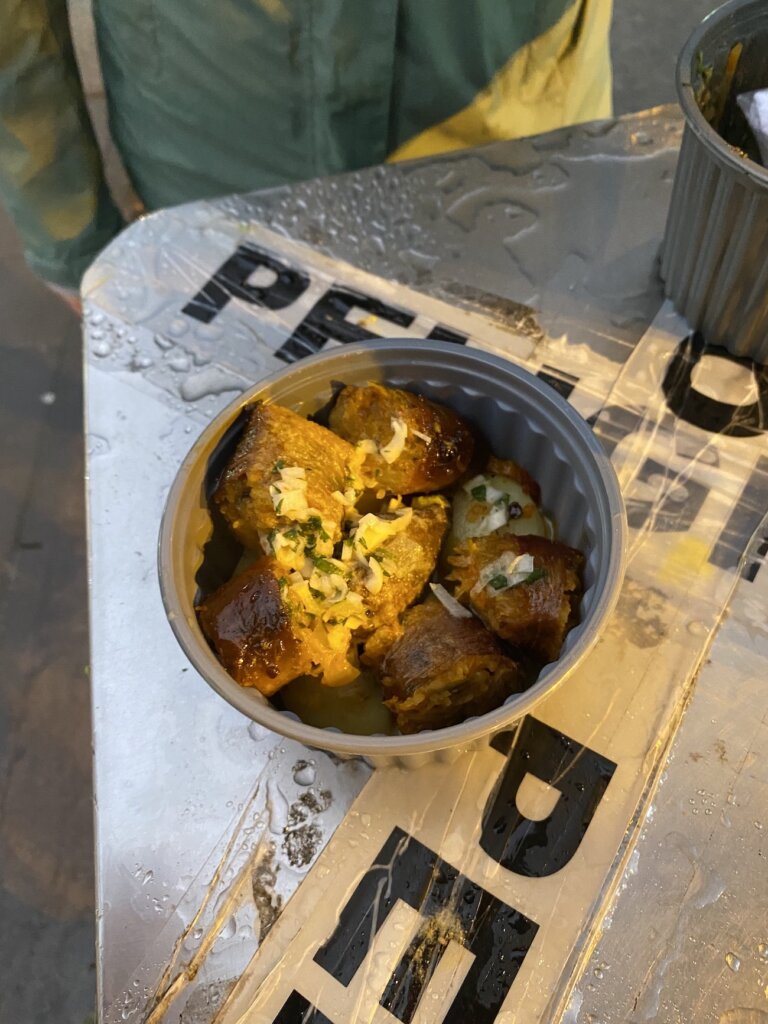
The thing to try here is the Tripa Mishqui – or BBQ tripe. It’s a typical meal in Ecuador and something we had never had before. Tripe is stomach, typically from a cow. In this preparation the stomach is cleaned, grilled, cut into small pieces and put back on the grill along with some oil to crisp up the outsides.
The vendors will definitely get your attention as you walk by and will gladly let you sample this before ordering. One order cost us $3 and was a lot of food. You can choose between several options for starches you want added to your bowl, we opted for potatoes (papas). To top it off you get a small bag of carrots, onions, and cilantro to sprinkle on top. The larger pieces we found to be a bit chewy but the smaller pieces were very good, having a grilled meat flavor with no gamey or strong “organ” taste.
The cart next door was offering morcilla or blood sausage which we had in Spain and absolutely loved! We ordered that as well- one order cost us $2.5o. The large bowl was filled with potatoes and then topped with the morcilla. The morcilla here was filled with rice and a variety of spices- clove and cinnamon stood out to us. While we preferred to morcilla we had in Spain we definitely enjoyed this variety as well and would recommend trying it if you are here.
More Details:
While there were several other food carts in the park we would have loved to try we were quite full after our dinner of $5.50 and decided to end it there. Next to the food carts are several small metal table tops you can stand around to eat. There are also places in the park to sit if you want to find a quieter place to eat after you grab your food. This also seemed like a popular place with locals to “take out” their food and bring it home. We saw several people with the food truck bowls walking away from the park with their food all packed up.
After traveling though Mexico where we seem to constantly find street food and Sunday Markets full of little carts like this we were so happy to find this place. We read several posts about all the various street foods found in Ecuador. During out time there we didn’t find a lot of street food readily available in the historic center of the city or other places we travelled through. If you are in the historic center the Mercado Central would be our recommendation for traditional foods and a good price. The market is full of venders selling a variety of foods for you to try!
Street food is a great way to eat local food when you’re traveling! What are your favorites? What did we miss in Quito? Leave us a comment below.
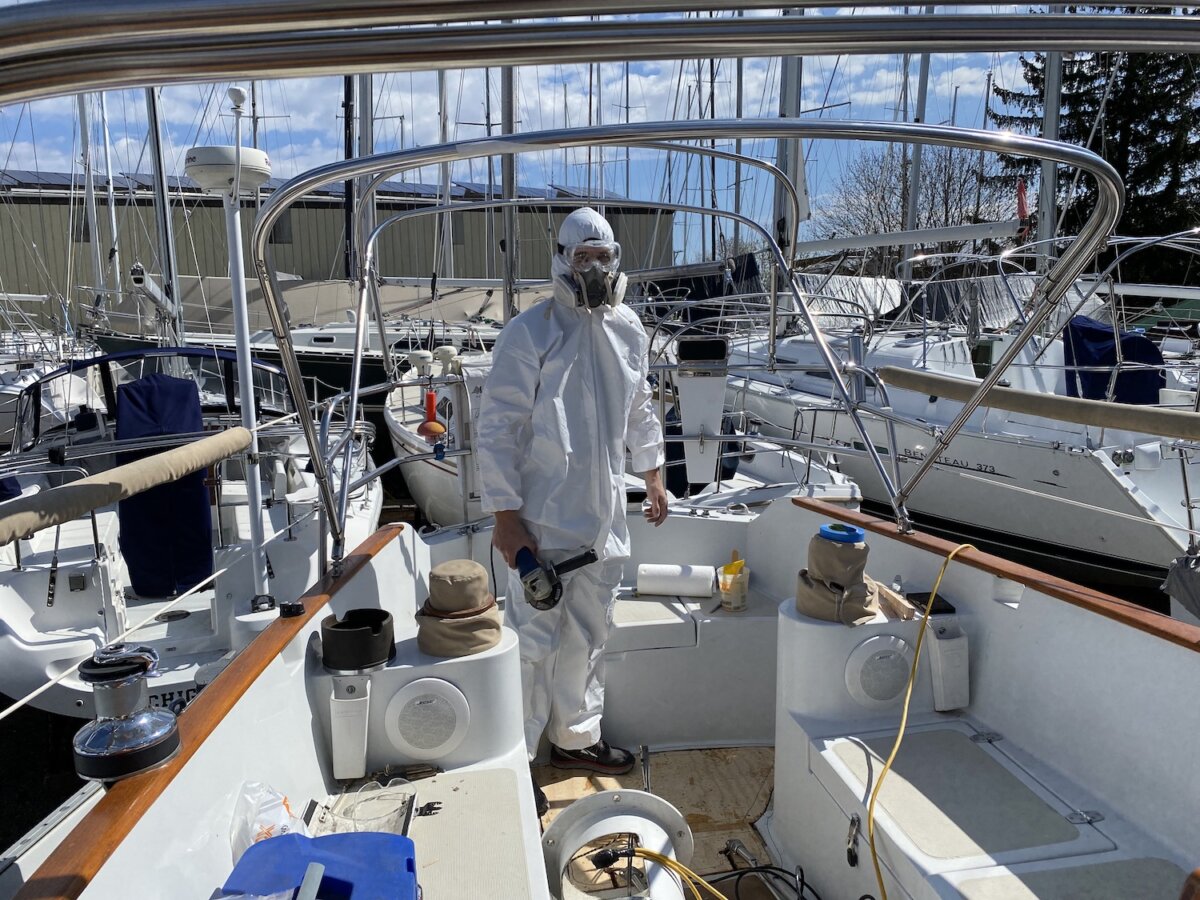
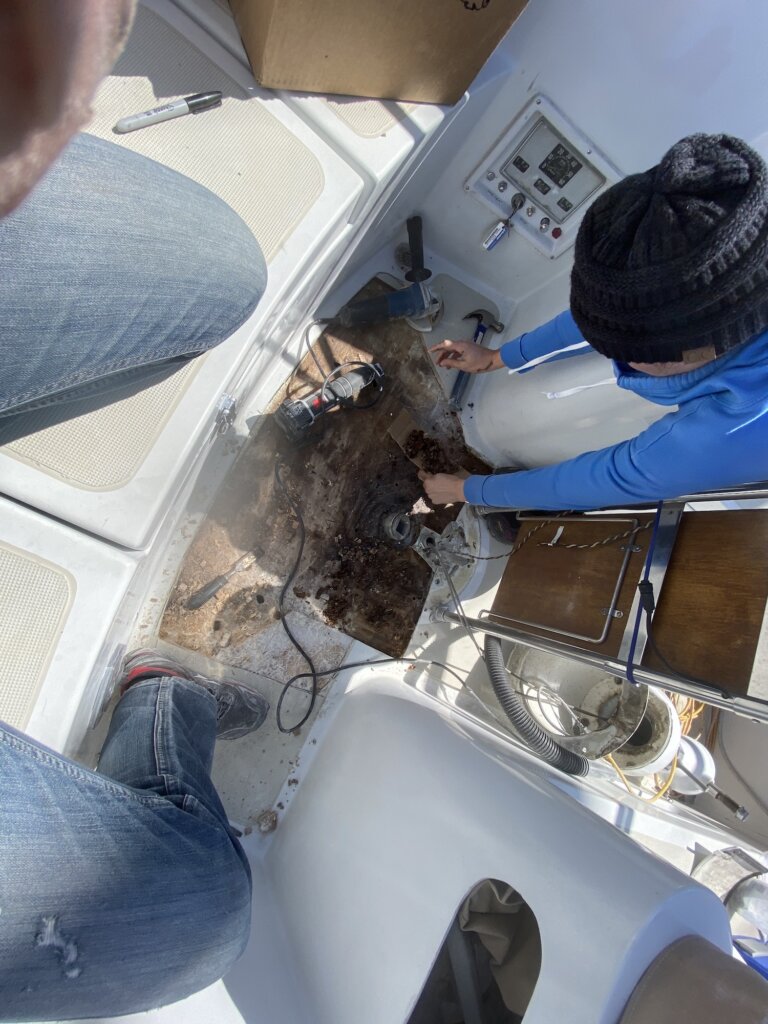
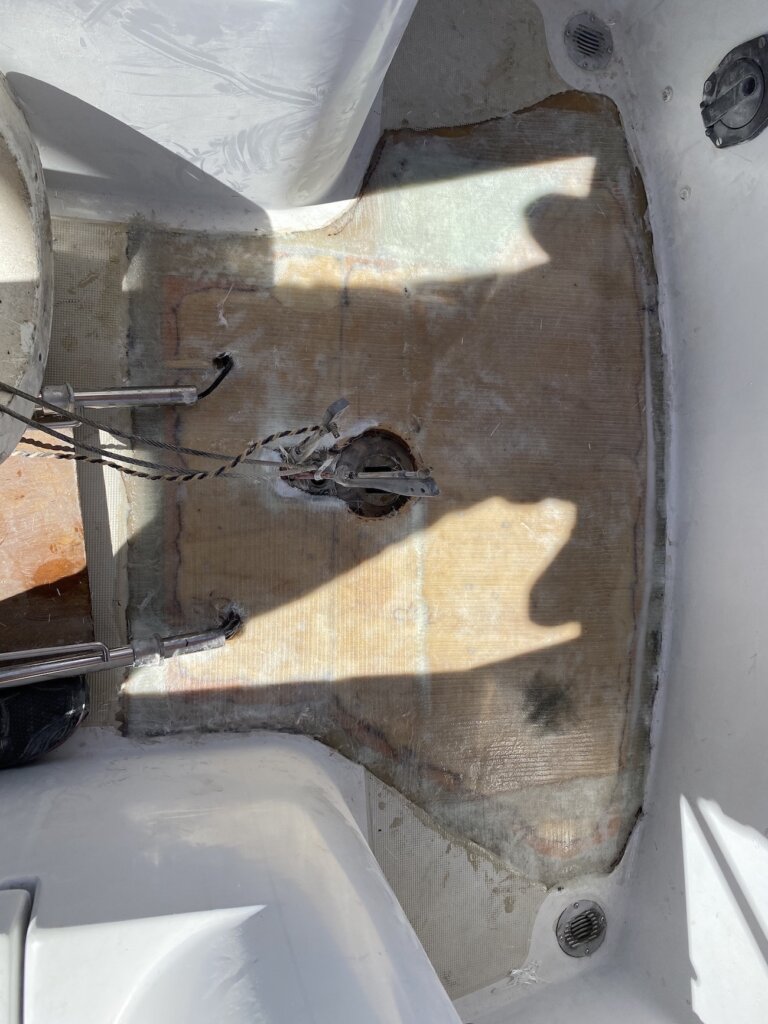
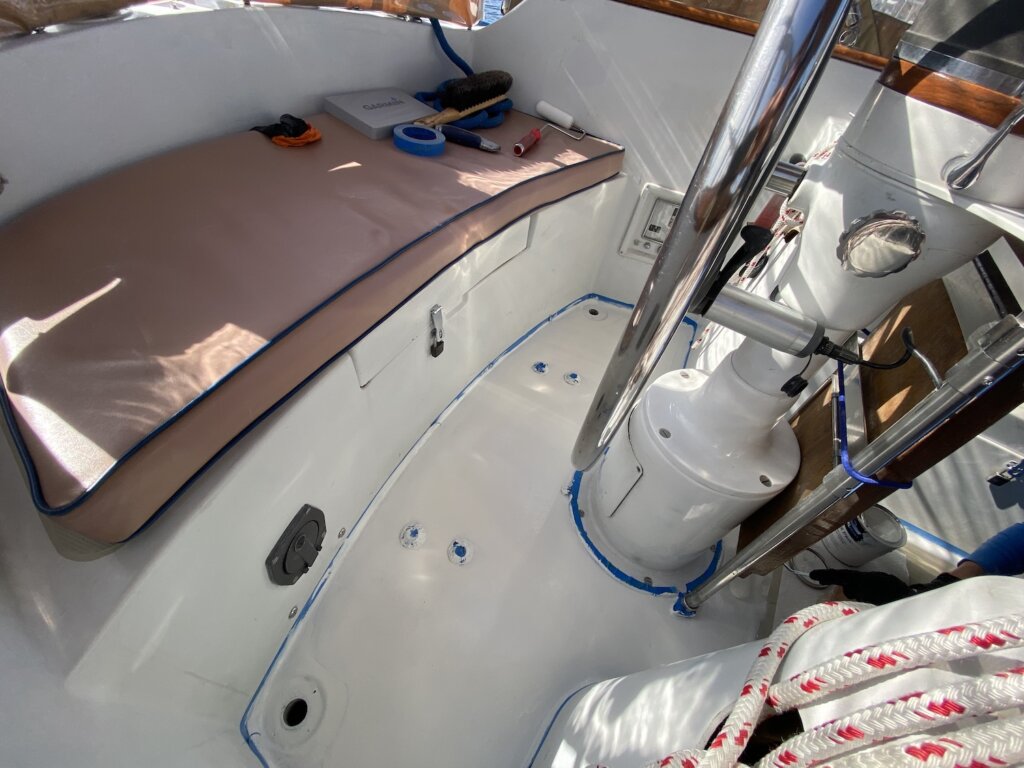
On our sail down to Muskegon from Bowers Harbor, we noticed flexing under the helm when steering hard. We knew moisture was high from the survey, but we didn’t think of the practical concern and thought it would be a ‘someday’ project. After that sail down, we knew it was a critical project for the safety of the boat, so it was the first place we decided to tackle.
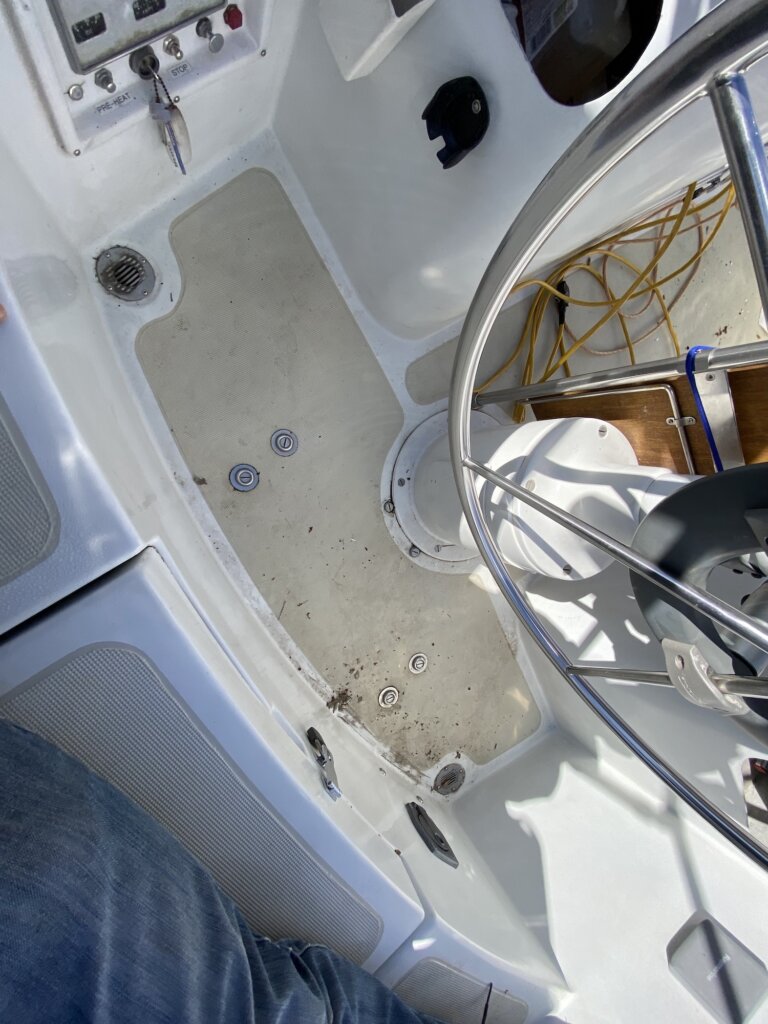
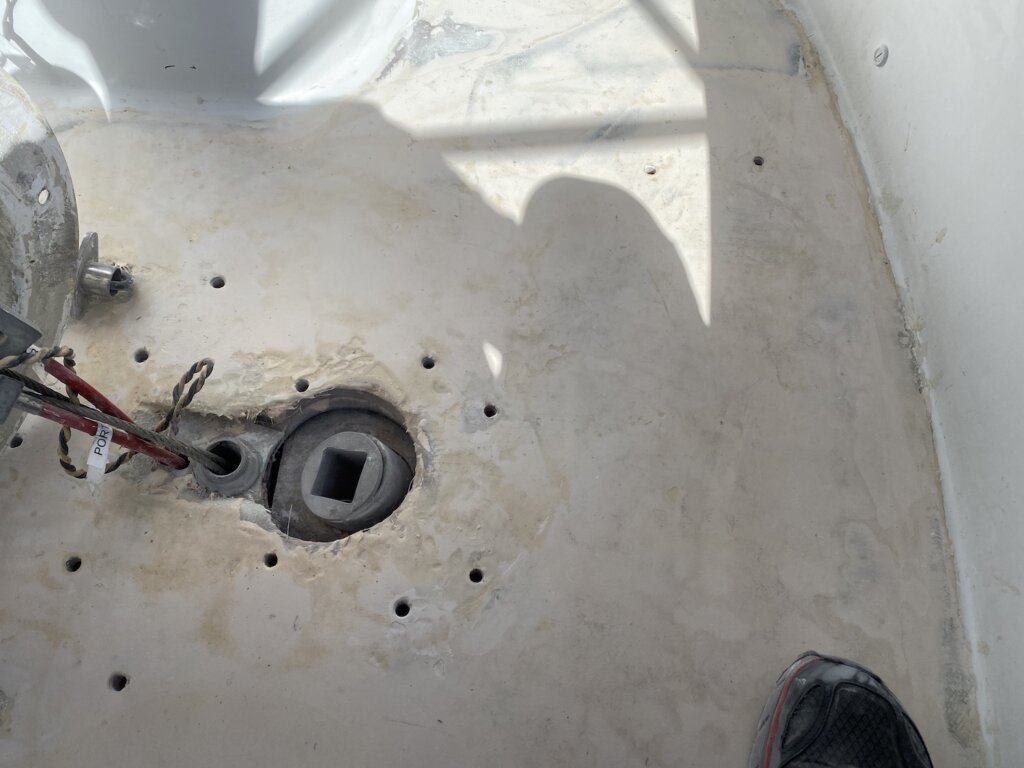
The area that was wet & rotten was the entire helm area, to just forward the steering pedestal (which we had to remove. The 4 bolt heads aft of the pedestal hold the steering brackets on our Ericson. All the steering hardware had to be removed prior to recoring the deck here.
Chiseling out the rotten and wet core. Our cockpit has end-grain balsa core which does a nice job of isolating water intrusion to close to the hardware. We were able to get all the bad stuff out with a chisel, hammer, crow bar, and anything else that can do some damage. We also found a straight bit on a router set to the right depth can help make this process quicker when you hit the high moisture but still bonded areas.
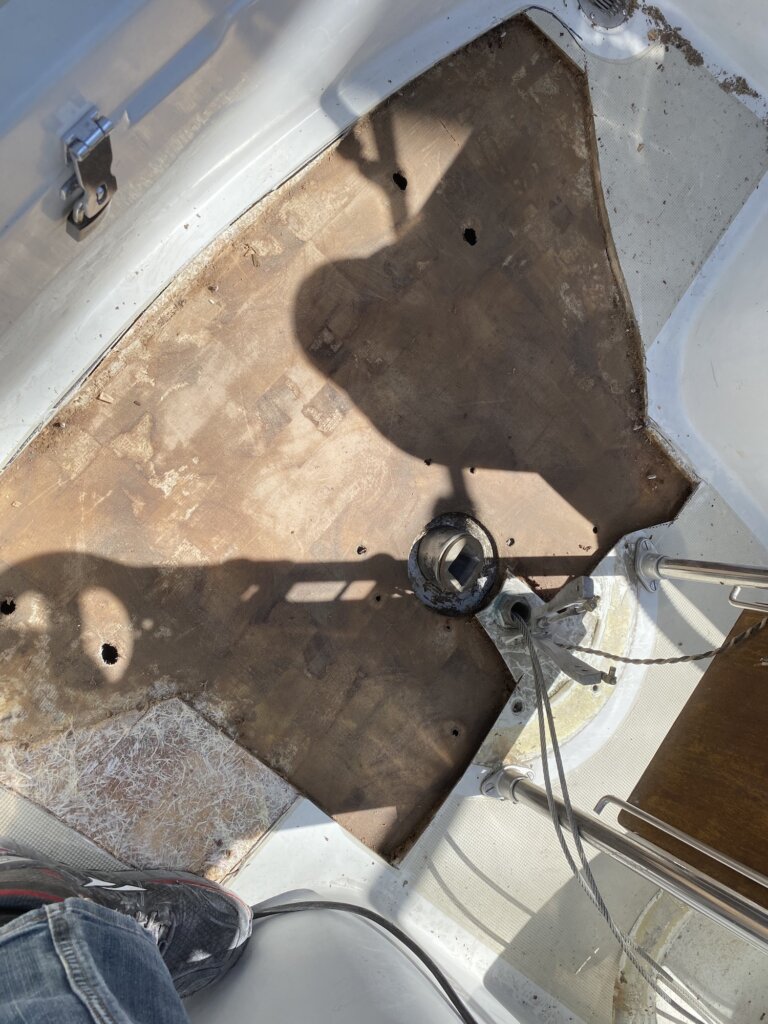
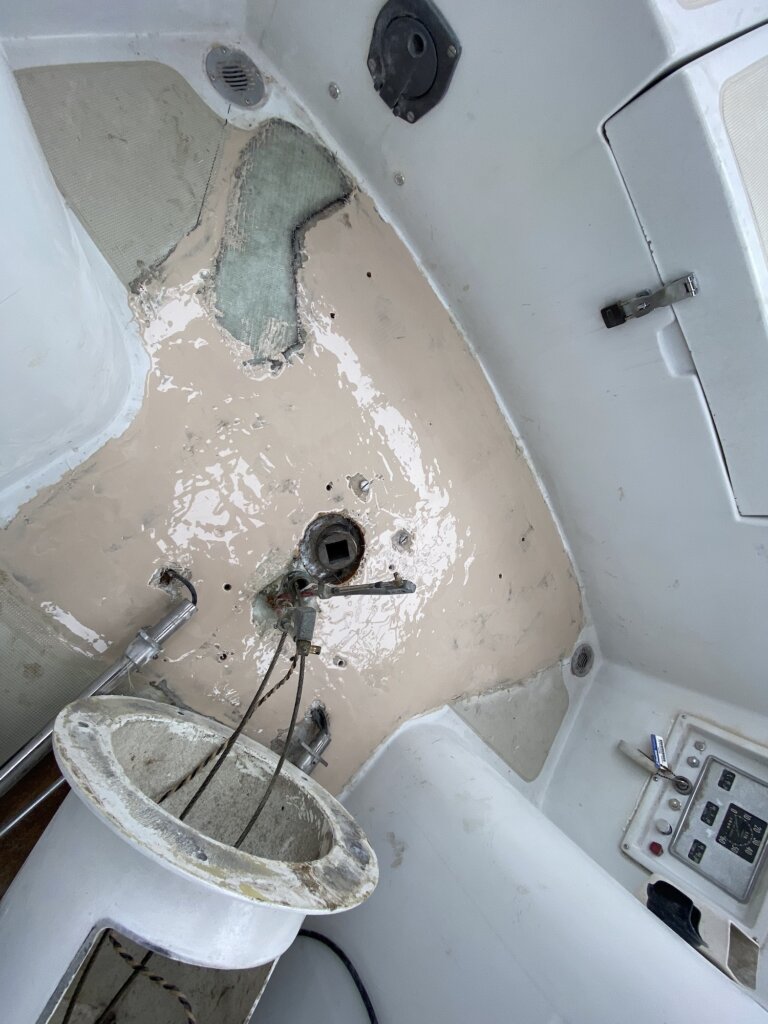
After the core is removed prep the area: Sand, remove any old fibers or wood, and wipe with acetone.
The final product before the new core. We ended up extending it forward more than our original tapping.
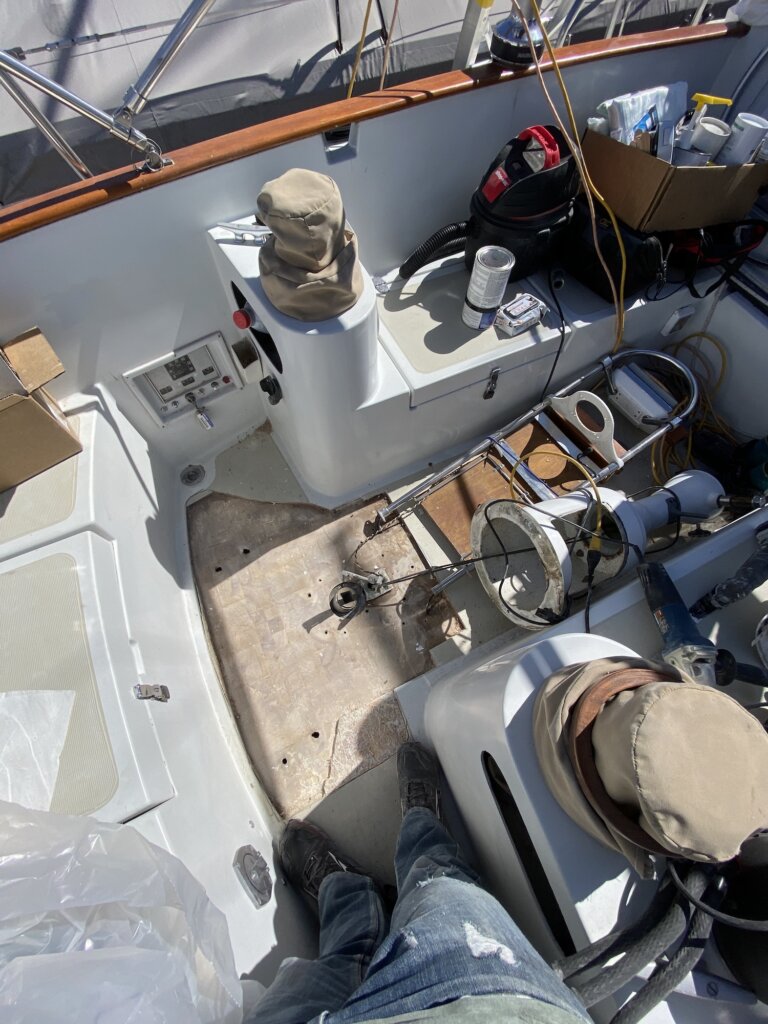
We cut the core to shape, ground down the edges with an angle grinder, and used West Systems 403 filler to epoxy the core down to the bottom layer. We tried to grind a groove into outer edge to make sure when we were done with the project, the water still drained well to the corners.
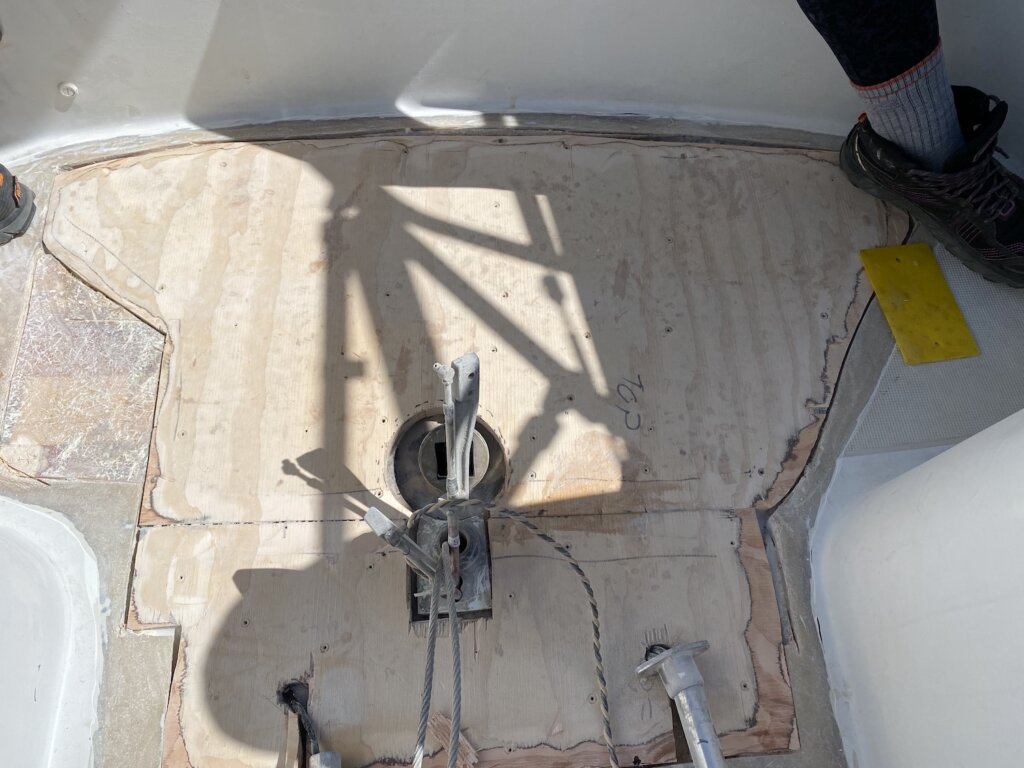
After the core was bonded and ground out, we glassed it in with 1708 Biaxial fiberglass, which is basically a three-in-one fiberglass material for additional strength.
After the first fairing with West System 410 Fairing filler, we had to add an additional layer of fiberglass mat to build up the area to make it level. After each layer of fairing, we sand smooth and find low spots and imperfections. Expect 2-3 fairing layers to get the finish you want.
After the third layer of fairing, we sanded heavily. While it doesn’t look smooth visually, your hand is a much better gauge.
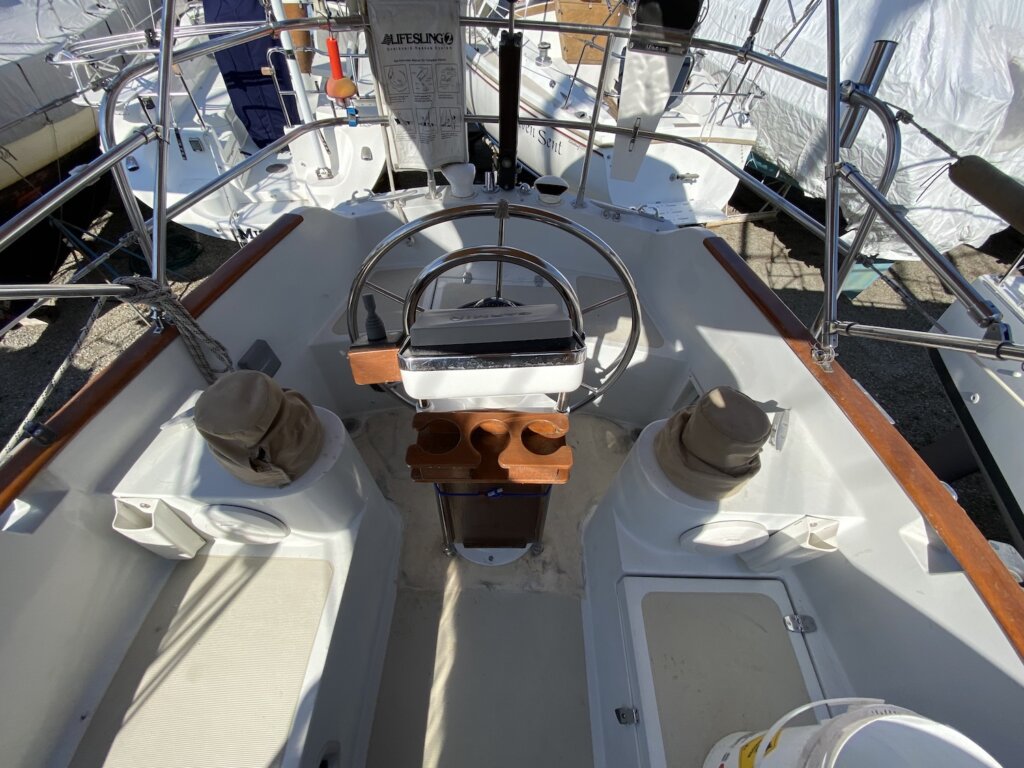
Once happy with the fairing, we reinstalled the steering pedestal to get the boat ready to go in the water.
We primed the repaired area with Total Boat Topside Primer, then finished with Total Boat Wet Edge Topside Paint. We used a foam roller with moderate success (it disintegrated pretty quickly)
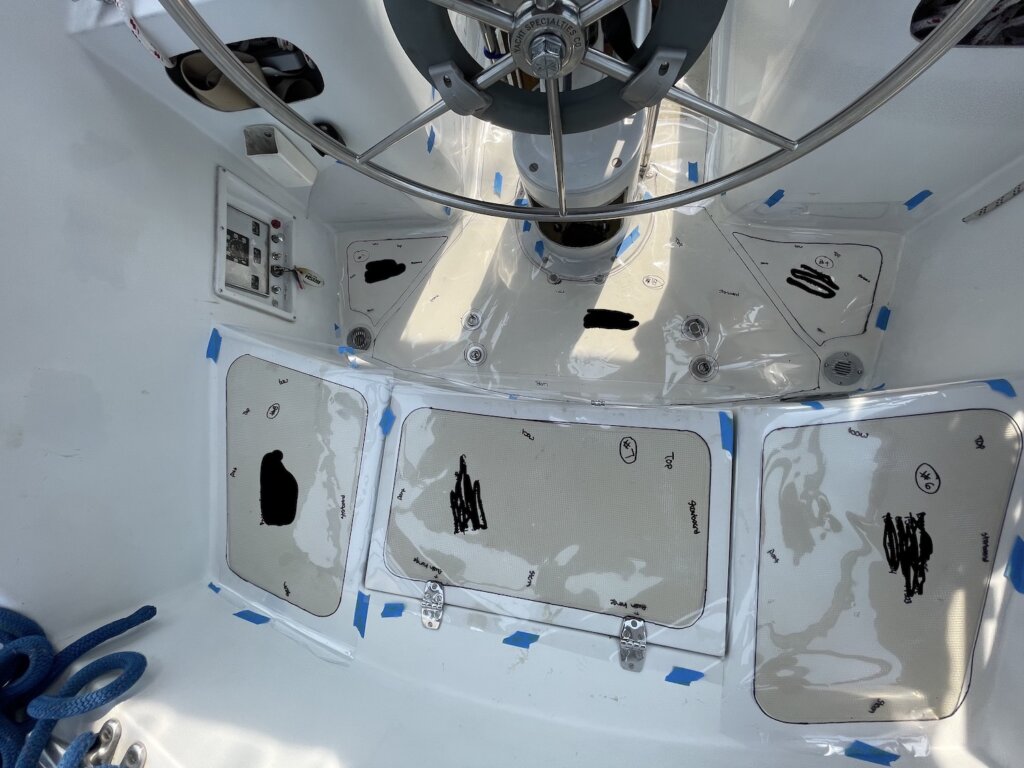
To be continued… we are getting Seadek in our cockpit! This is a picture of the templates we made and sent back to Seadek to be scanned. The process overall was very smooth, which we’ll show in a future post!
Hope you learned something, let us know if you’ve ever done core work on your boat. If so, how did you do it differently, and have any advice for us in the future? Let us know in the comments below!
We read about Banos being a lovely little town full of beautiful scenery and great restaurants/cafés. It’s also known for having lots of adventure activities from zip lining to white water rafting. What we didn’t really realize until we arrived is that you are at the edge of the Amazon rainforest. The landscape changes dramatically as you drive from the Andes Mountains into Banos.
We only stayed for two nights/two and half days but this is a place that you could definitely stay longer. We chose Hostel balcon del cielo. We booked them for the view from their balcony. You overlook the river and the valley below town, you can also watch as people bungee jump from the large bridge. You are served your breakfast on the balcony each morning. Of course, you can enjoy the views throughout the day as you wish. The hostel was on the edge of town but only about a 5 minute walk to the central square and center part of town. There is parking available but it is down quite a steep, long hill at the other property they own. Our little car barely made it back up the hill.
After hiking in the Andes we were ready for a little relaxation so our first afternoon in Banos we head to the public baths. There are several public bath options in the area, ranging in price. We chose to go to the Thermals de la virgin. The entrance fee was $3 per person plus $1 for a swim cap. There are several different temperature pools to choose from. You have a great view of the waterfall from the pools and you can rinse off/cool off in the showers with water straight from the waterfall.
When you arrive you will buy your cap at the little stand located right after the entrance then head upstairs to change. They have bins for you to put all your clothing in and a “locker area” where you will leave your bin and get a small tag with what number your bin is located in so that they can return your stuff to you afterwards. You will need to rinse off in the warm showers before choosing your pool and getting in.
They do drain the pools every day at 4pm, clean then out and then refill. They open back up at 6? So do be aware of that when planning your visit. This is a popular place with the locals as well as tourists.
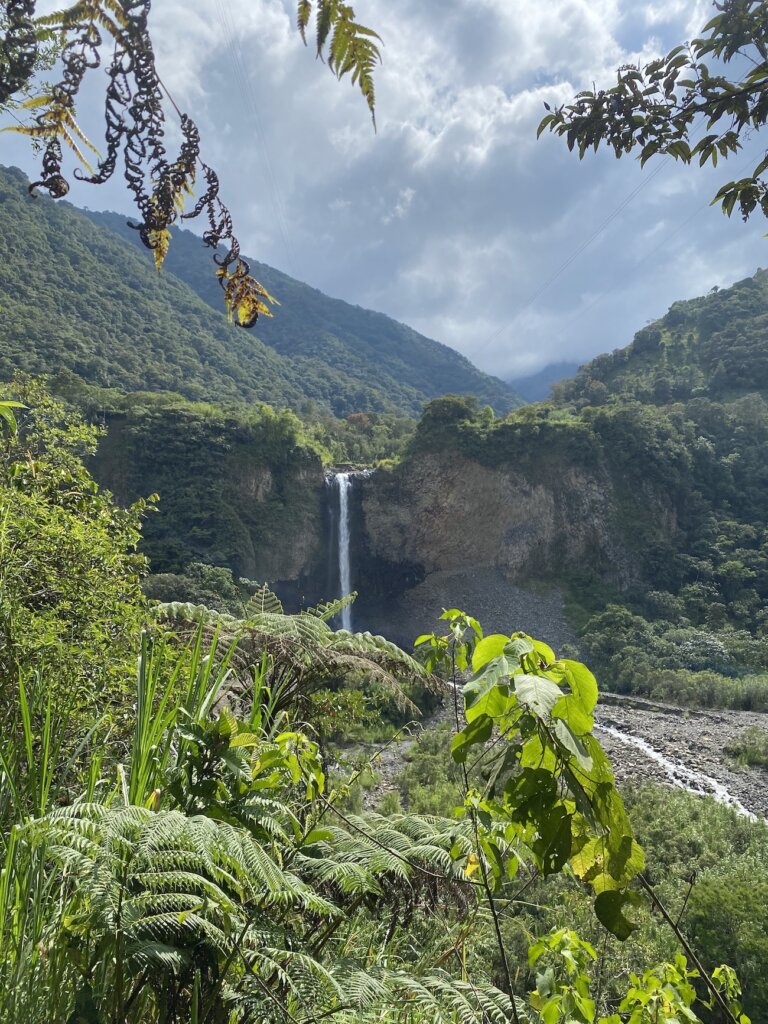
Our second day in Banos we headed off to the Route de las cascadas (waterfall route). This is a section of E30 that heads from Banos towards the Amazon. The drive is beautiful and we found ourselves driving for 30-45 minutes, taking pictures along the way before we realized we passed everything we were there to see.
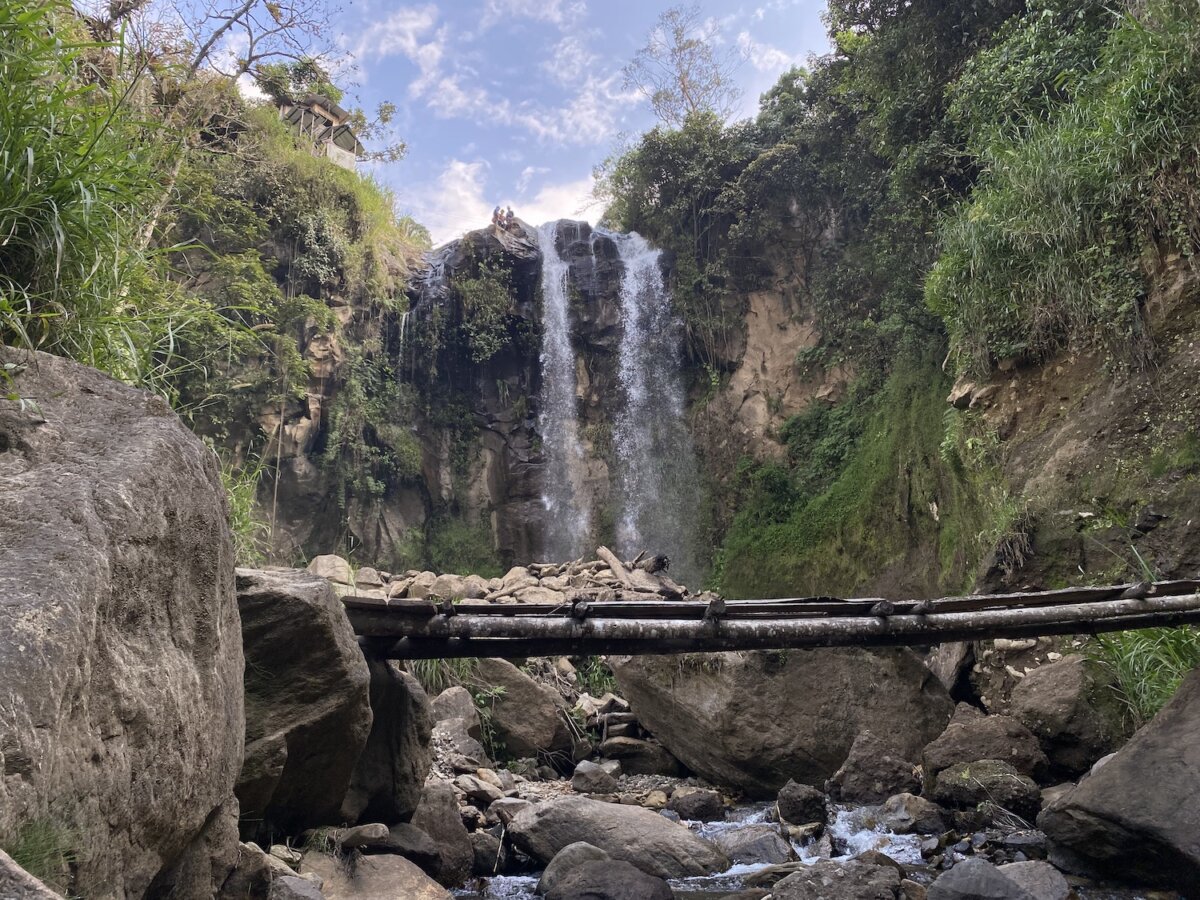
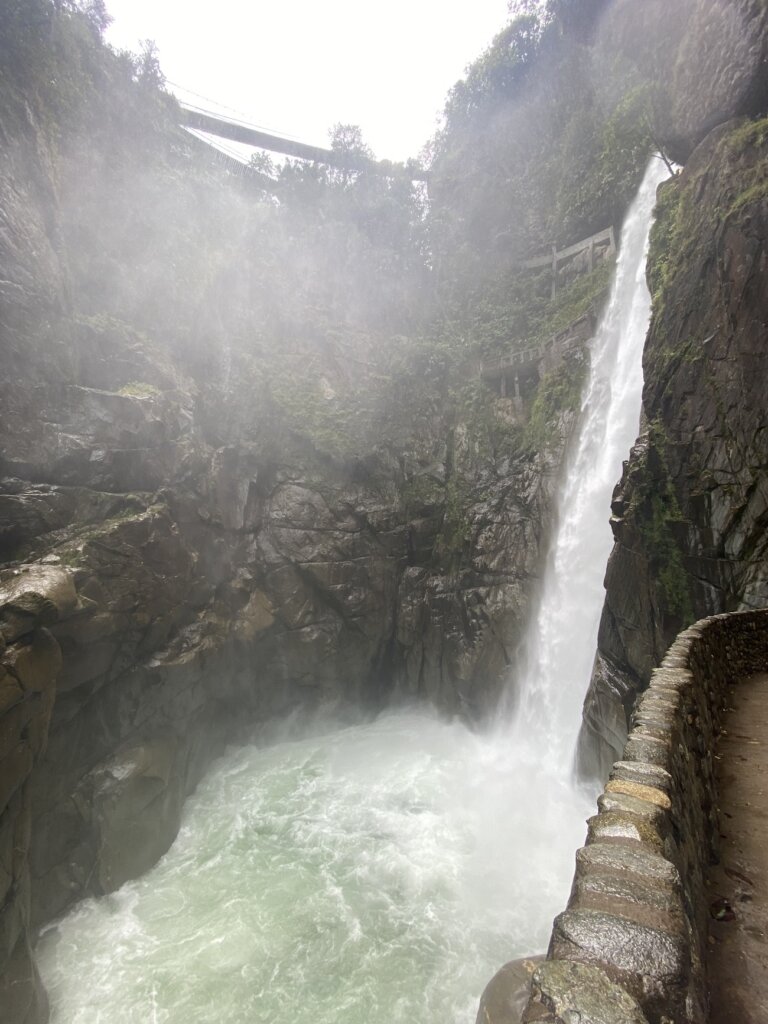
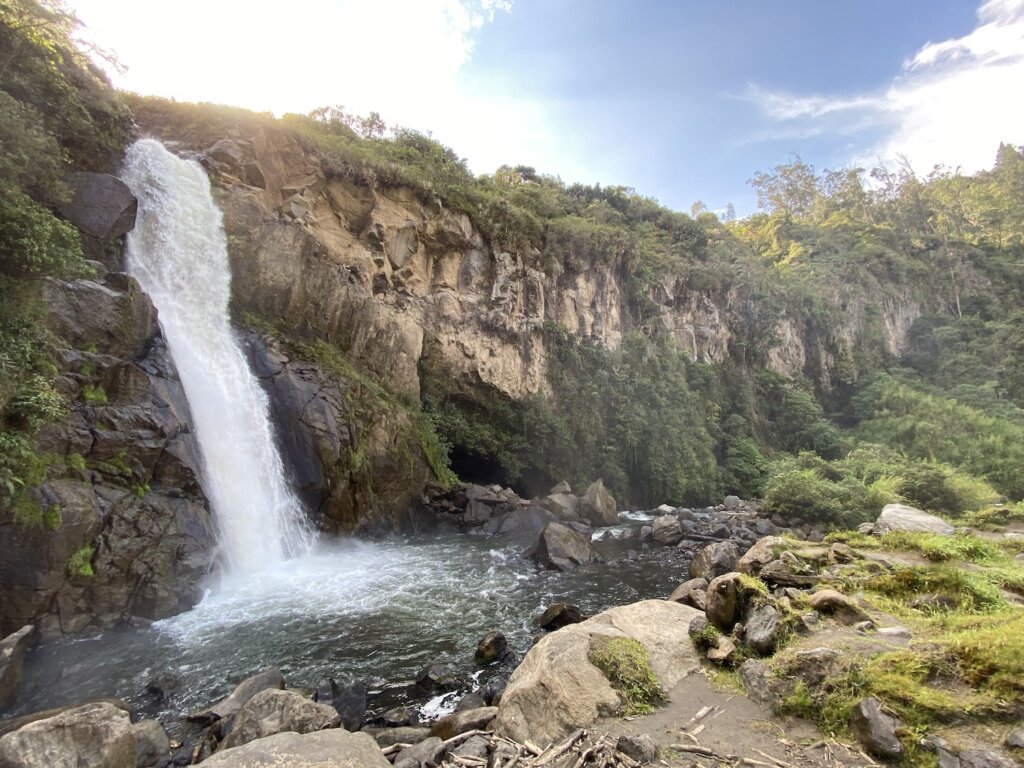
The largest waterfall/biggest attraction is Pailon del Diablo (The Devil’s Cauldron Waterfall). This is located in the very small town of Rio Verde. We assumed there would be signs along the main road but we didn’t see any. When you arrive at the waterfall there is a sign and you can chose to enter to the right by the river or drive straight ahead into what looked to us like the main entrance. We chose the main entrance.
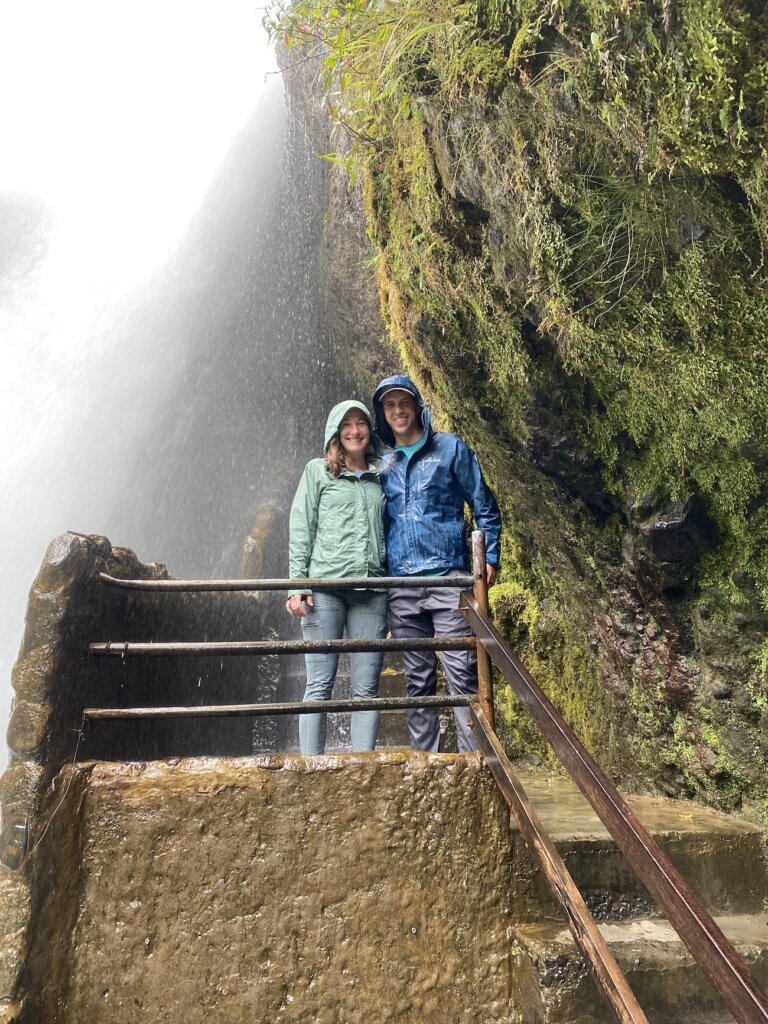
It will cost you $1 to park and from there you will start along the trail that will lead you to the entrance. The entrance fee is $2 per person. Once we got to the waterfall we realized the entrance we chose gets you to the lower stairs towards the bottom of the waterfall. There were also stairs up to get you behind the waterfall. You will get soaked but it was a very cool experience. We saw bridges and stairs higher up that we didn’t have access to so we assume that the other entrance would have lead you to view the waterfall from higher up.
After viewing the waterfall we headed over to the suspension bridge to get a view of the entire waterfall from a little further back. Across the bridge is a café that we chose to sit and have a coffee/hot chocolate at and take in the views before heading out.
We stopped for lunch at a restaurant near the parking lot. We orders almorerzo plates which is a great way to get a very large meal for cheap. We had juice and soup included in the price. The actual plate of food offered whatever meat you chose, a small salad and some sort of bean or potato.
After lunch we were on a mission to find all of the waterfalls said to be along the road. Our first attempt we stopped at a site that had a large staircase which we assumed would lead to a waterfall. It did not and we were pretty sure we parked on someone’s private property so we quickly kept driving. We pulled up Gaia GPS which showed on the map where the waterfalls were located. Another one we drove by had a huge welcome sign and a small shop that lead to a path up to see the falls but a locked gate kept us out.
Finally we found a few that were open and that we could visit but not without also finding a few more locked gates along the way. The waterfalls we were able to see were great. We aren’t sure if the closed gates were due to COVID and having less visitors in the area or for some other reason. We were there on a Thursday afternoon.
We were expecting something similar to a road to Hana experience on Maui. A nice drive with lots of pull outs of beautiful things to see. While that is here, the tricky thing is the tourist infrastructure isn’t really set up well. Trying to find parking along this highway road to pull off and walk to a waterfall isn’t easy and nothing is well marked.
The final waterfalls we went to, we pulled up in front of someone’s house. We figured we messed something up but an elderly woman sitting outside waved us forward. A younger woman came out of the house, told us it was $1 to enter. After we paid she lowered the wire that was closing the entrance off so we could pass through with our car. We drove a short way and then found a walk way to two separate waterfalls. Basically our message is, you have to work for it to see these waterfalls. So if you’re up for an adventure it makes for a great day trip.
We also read you can rent bikes and there is also an open air bus that that’s this route. That may be better way to go if you want less adventure/work in finding the falls. We also didn’t see the buses stopping or very many other tourists on this route while we were there.
Back in Banos we enjoyed some good food and drinks. We had dinner and drinks at Cráter rooftop bar which is on top of a hostel. This place was our most expensive dinner. Our total bill was about $46. We both had two drinks and our dinner- drinks wer about half our bill so the food its self wasn’t super expensive. They had several types of gin and tonics with gin from Ecuador so we had to try some! They were great, our favorite was the passion fruit. This place had a great atmosphere, lots of other travelers, a DJ, super nice staff, great views of the town. It wasn’t a place we saw any locals. For one evening it was a nice place to “splurge” on drinks and a meal.
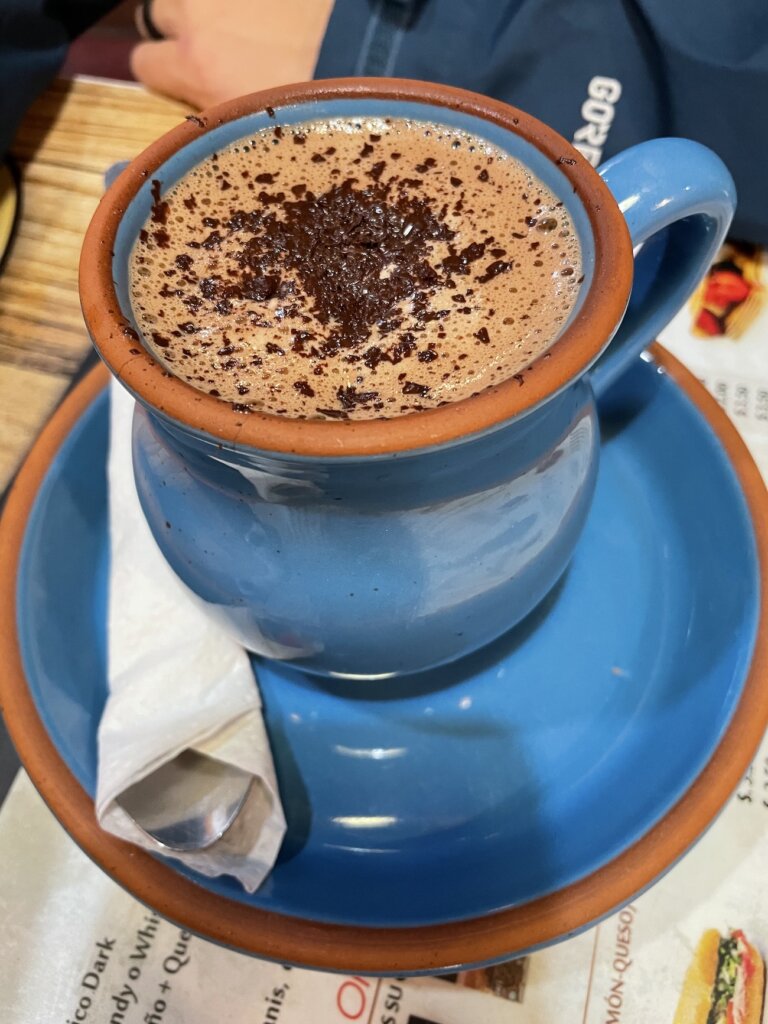
We also really enjoyed to cafes. We stopped at Honey Coffee and Tea. They are located right on the main square and have outdoor seating. We enjoyed a hot chocolate and watched the town go by. Our favorite and THE BEST hot chocolate we had during our trip was at Amari café. This place is not to be missed. They have several different types of hot chocolate you can order. We had the Amazonico Dark and the Chocolate con Especias. Both were excellent. You can also by bars of chocolate here to bring home. They had pretty much every flavor of Pacari Chocolate available.
This was the perfect town for us to end our Adventure through Ecuador! We got a taste of the Amazon rainforest and would love to explore more if it! From here we headed back to Quito for our final night.
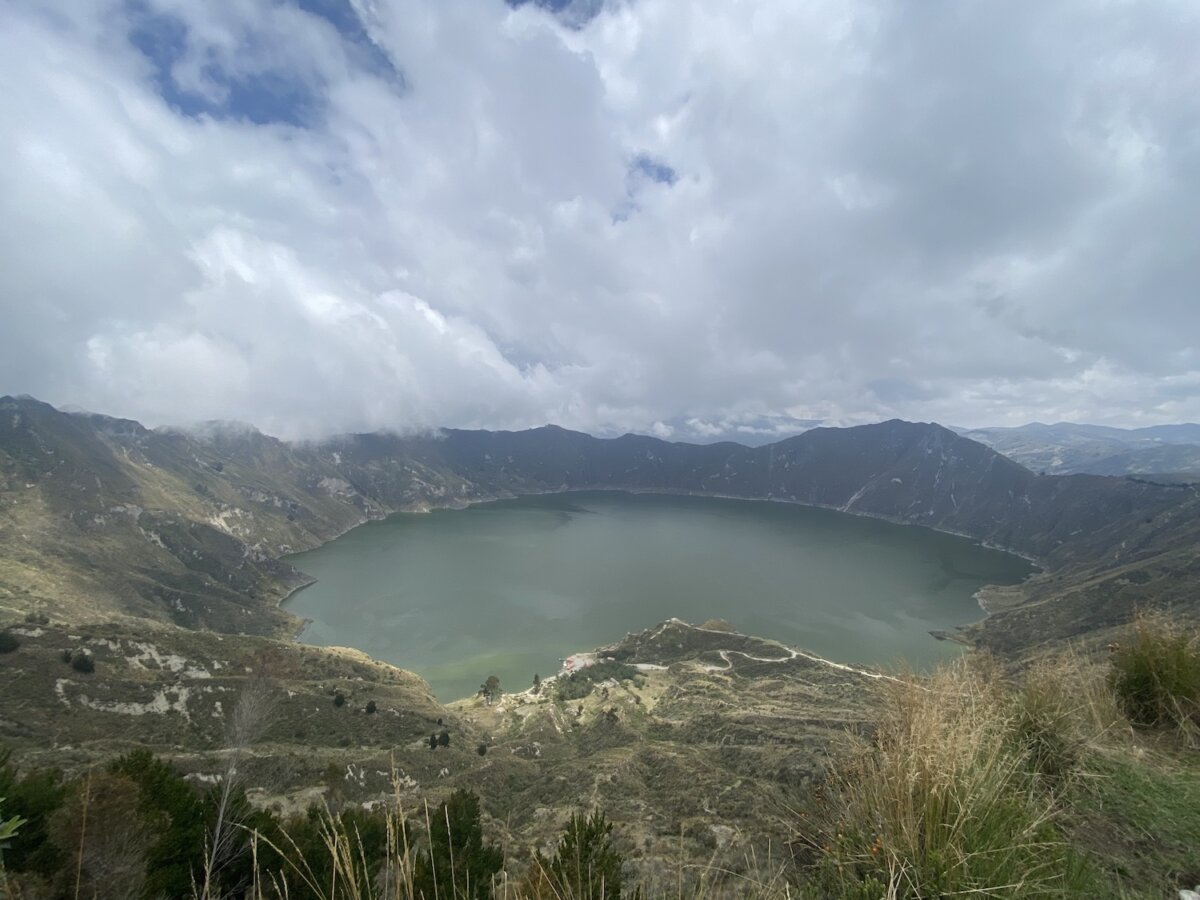
If you have looked into traveling around Ecuador you have probably seen photos of Quilotoa, a beautiful crater lake. It is worth your time to visit even if you don’t plan to do the multi-day trek.
Blog posts we read before our trip said the entire loop takes 2-3 days. Since we didn’t have that much time to spend here, we didn’t research much further. We figured- let’s just day hike around and enjoy the views. When we arrived we saw on the map that there is a 10km hike around the crater. That is definitely doable in a day so we went for it! There are multi-day treks if you are interested in spending more time here. Those treks take you from various small towns around the area with several options for hostels to stay at along the way.
The trail we took can be found here. It took us about 3-3.5 hours. We found the trail to be well marked with red and blue dots along the way. The map at the entrance did make it seem like we wanted to be on a yellow trail and we never saw any yellow dots marking any trail. We were slightly concerned at first, but we used Gaia GPS to track our progress and felt confident we were on a trail we could complete in one afternoon. On the trail, you hike up and down several peaks around the lake which is at 12,841 ft elevation. The hike was challenging but worth it! The plants/vegetation change as you hike around the crater and we saw several types of beautiful wild flowers.
We got into town and started our hike around 11:30 am. For us, the view of the lake only lasted about the first 25% of our hike before the clouds started coming in. We would highly recommend getting there early in the day to start your hike. The weather seems to be better in the mornings. The clouds/rain seemed to come in during the afternoon hours throughout our entire trip through Ecuador. We were there in November which is the start of the wet season. Bring your rain coat and/or windbreaker for sure. The weather can change quickly here so be prepared rain or shine!
To visit the crater you will need to pay $2 per person at the entrance to the town of Quilotoa. Once in town, there are a few parking lots you can park for free and take the very short walk to the crater. There is a large viewing platform you can take pictures of the lake from before you begin your hike. The trail starts on either side of the viewing platform. In town you will see several restaurants and shops but overall it is a very small town.
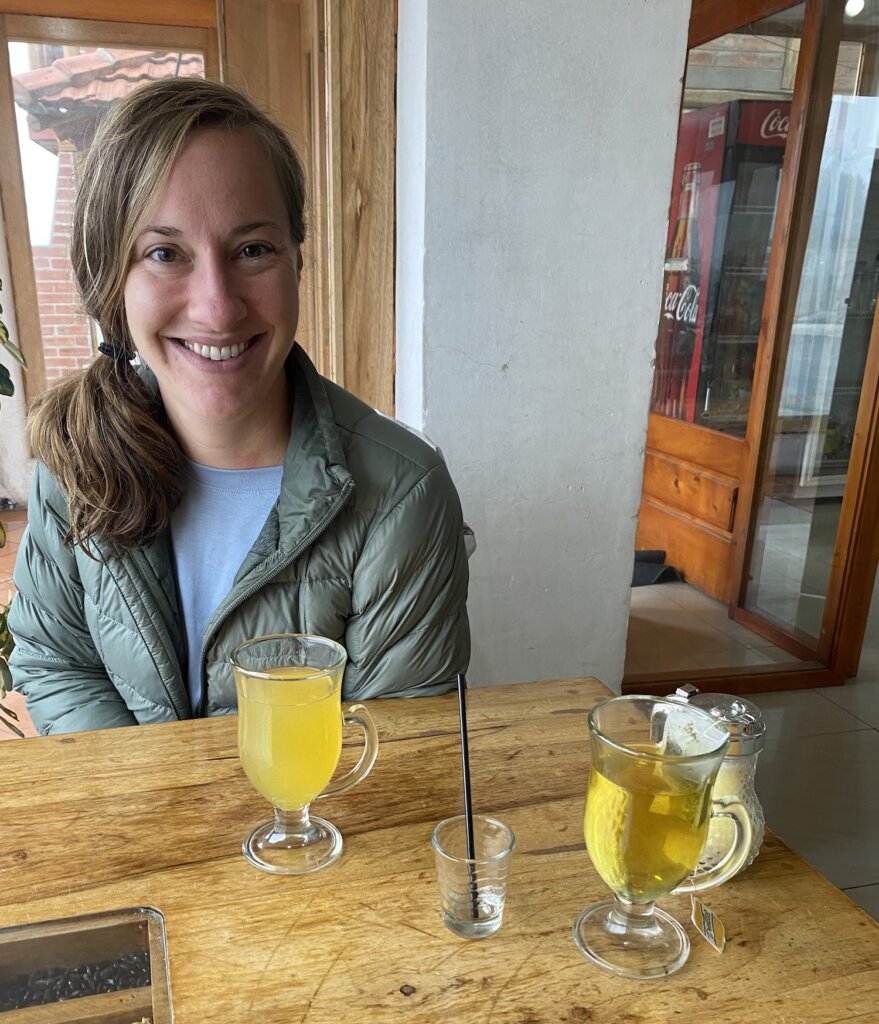
After our hike we ate at one of the small restaurants right off the trail. We had one of the best hot chocolate’s here and tried cocoa tea and canelazo as well. All the warm drinks were exactly what we needed after a long afternoon on the trail.
We would highly recommend trying canelazo! It is a traditional warm drink in this region of the Andes. It’s made from naranjilla which is a sour orange fruit, water, sugar, cinnamon and sometimes other spices along with aguardiente liquor. When we ordered it the liquor came in a shot glass on side so you could chose if you wanted to add it or not. With and without the shot, the drink was delicious! We wished we would have had it more. Canelazo is pretty readily available in the mountains but don’t expect every coffee shop or restaurant you go to have it. When you see it, try it! The hot chocolate in Ecuador is another thing not to be missed! We found ourselves ordering it every chance we got!
While we were in Quilotoa, we also tried the coy asado which is grilled guinea pig. This is a very common dish in the region. The order here was probably a quarter of a guinea pig. Most places sell the entire thing as a large platter which is too much for the two of us. We were glad to be able to try a smaller portion. It was very good, but difficult to eat with the plastic utensils we were given (this may very well have been due to COVID). It would have been much more enjoyable with proper silverware.
Google maps doesn’t seem to have all the restaurants in the area listed so we can’t seem to find the name of this place. Most of the restaurants in the area appeared to have the same types of traditional foods. After a long day of hiking you can’t go wrong wherever you chose to go to warm up in Quilotoa!
After our day hike around Quilotoa we stayed at Hostel el vaquero. They don’t have a website but you can book on booking.com
This hostel is in one of the small towns you can stay at if you do the multi-day trek. We would highly recommend this place, they served breakfast and dinner included in the price of the room. They have a large common area with a wood fire burner and plenty of space to relax. They also have a sauna for $3 a person which we didn’t get to enjoy but would have loved to. The people were very nice and accommodating and the meals were excellent.
If you visit Quilotoa we hope you enjoy your hike! Tell us what your favorite hikes/treks are. Leave us a comment below